4. Build your first agent
You will alternate between two surfaces here: the canvas in VS Code (where you wire nodes) and /org/agents (where you create the Agent record). The canvas comes first because the names you pick on the canvas drive the names you enter in /org.
The four-name contract
Four names must line up across /org and your code. If any one drifts, the runtime cannot find the entry and the Chat shows "Invalid agent data!" or silently drops the request:
- Agent ID (in
/org, kebab-case) = Agent Name (on the Agent Node in your flow, kebab-case). - Start Flow (in
/org, no extension) = the file name on disk:src/flows/<Start Flow>.flow.json. - Start Node (in
/org) = the Node Label on the Start Node inside that flow file. - Space — your Agent must belong to the Space the Consumer has access to (the same Space you wired in section 3).
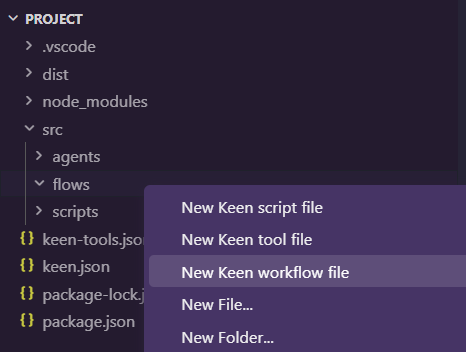
4.1 Create a flow file
To create a new flow: right-click on the flows folder in src → New Keen workflow file. Then input a name for your flow.
4.2 Open the flow canvas and the Node panel
You should be able to open the .flow.json file now. The menu below opens a sidebar with all the nodes you can drag and drop on the canvas.
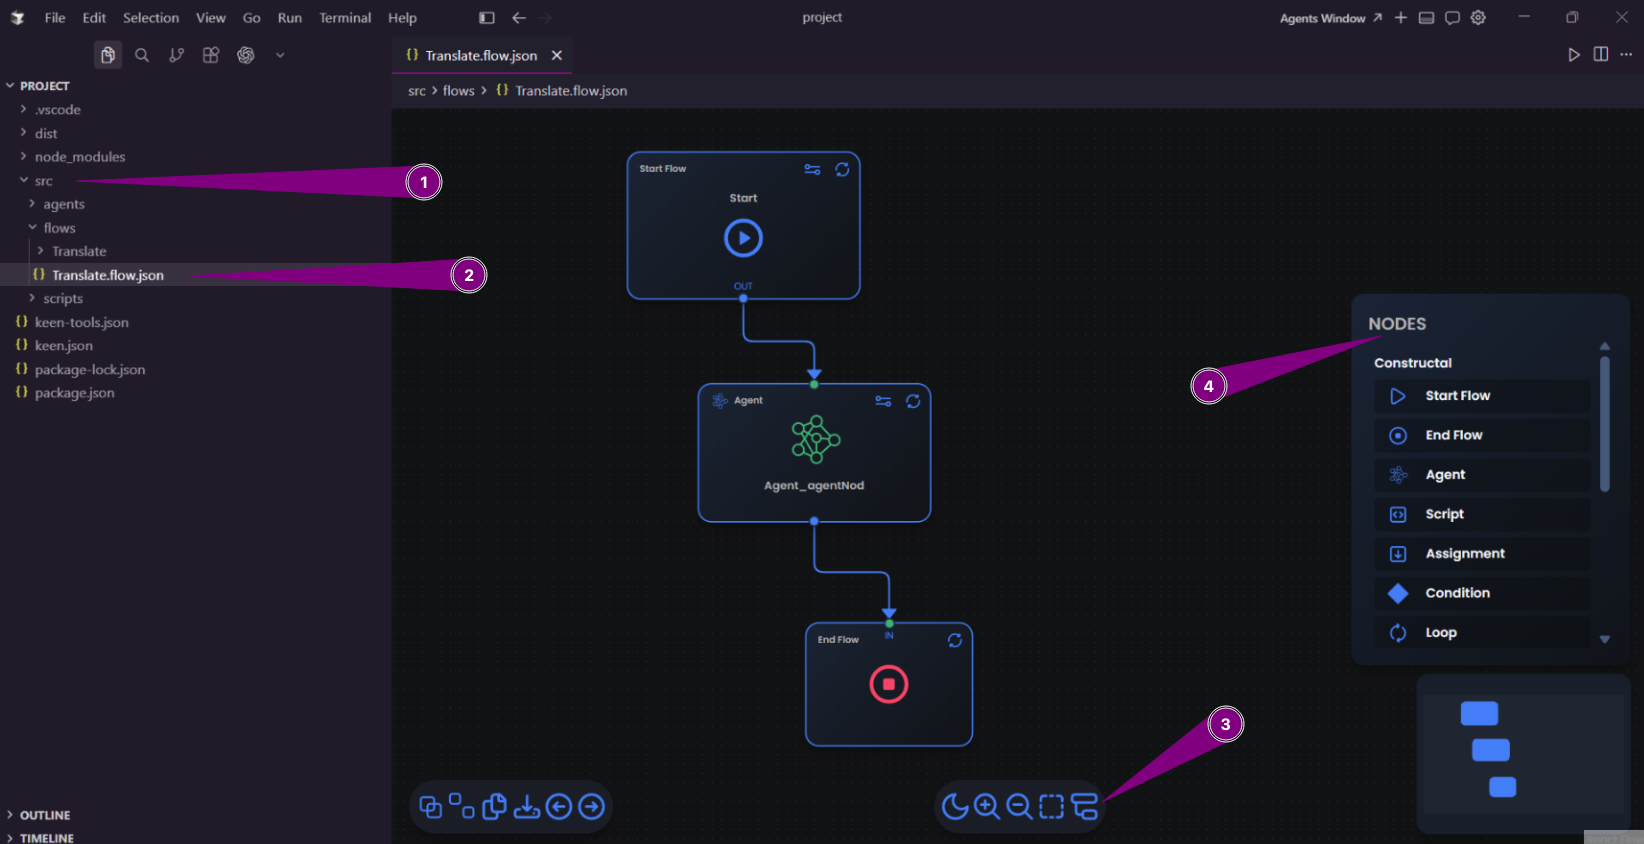
The panel offers the full node catalog — the Constructal building blocks (Start, End, Assignment, Condition, Loop, Script, Agent) and the Helper composition nodes (Run Flow, Jump Flow, Parallel, Parallel Flow, Parallel Context, Join). This quick-start uses just three of them; for the complete reference see the Keen Builder node catalog.
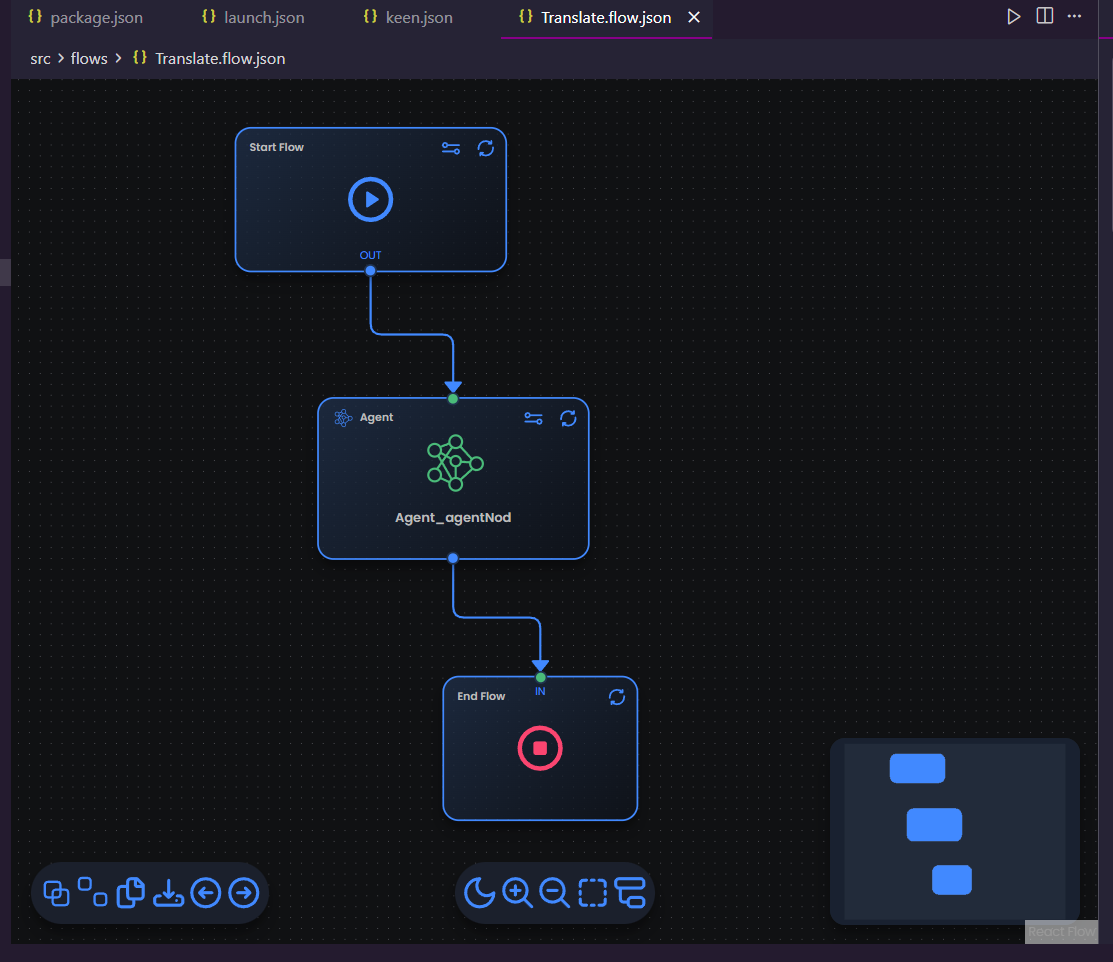
4.3 Drop three nodes: Start → Agent → End
For a simple flow that uses only one AI agent we're going to use three nodes:
- Start Flow — the entry point of the flow.
- Agent — the AI agent.
- End Flow — the end of the flow.
4.4 Configure the Start Node
It's important to add a label for your Start Node. You will use it in the sandbox administration when you create your Agent.
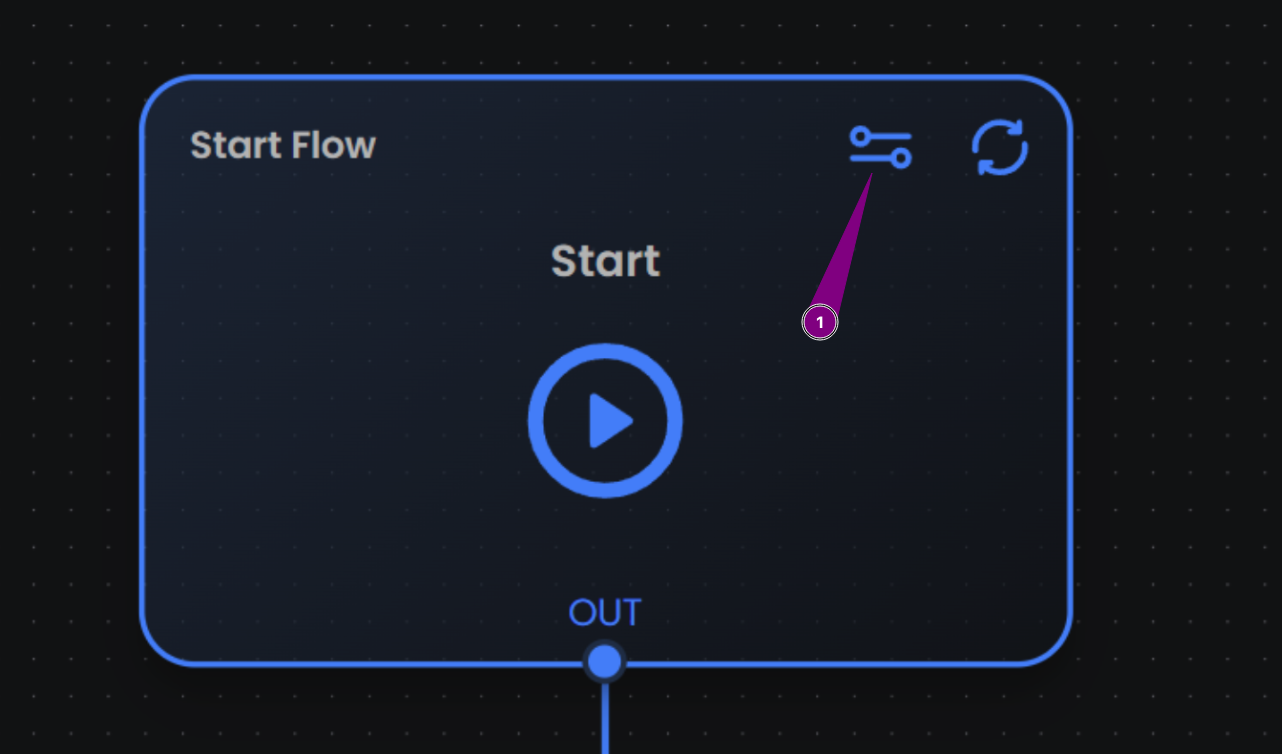
Click the settings icon on the Start Node (1) to open its settings:
Set the Node Label to Start (1) and click Apply (2):
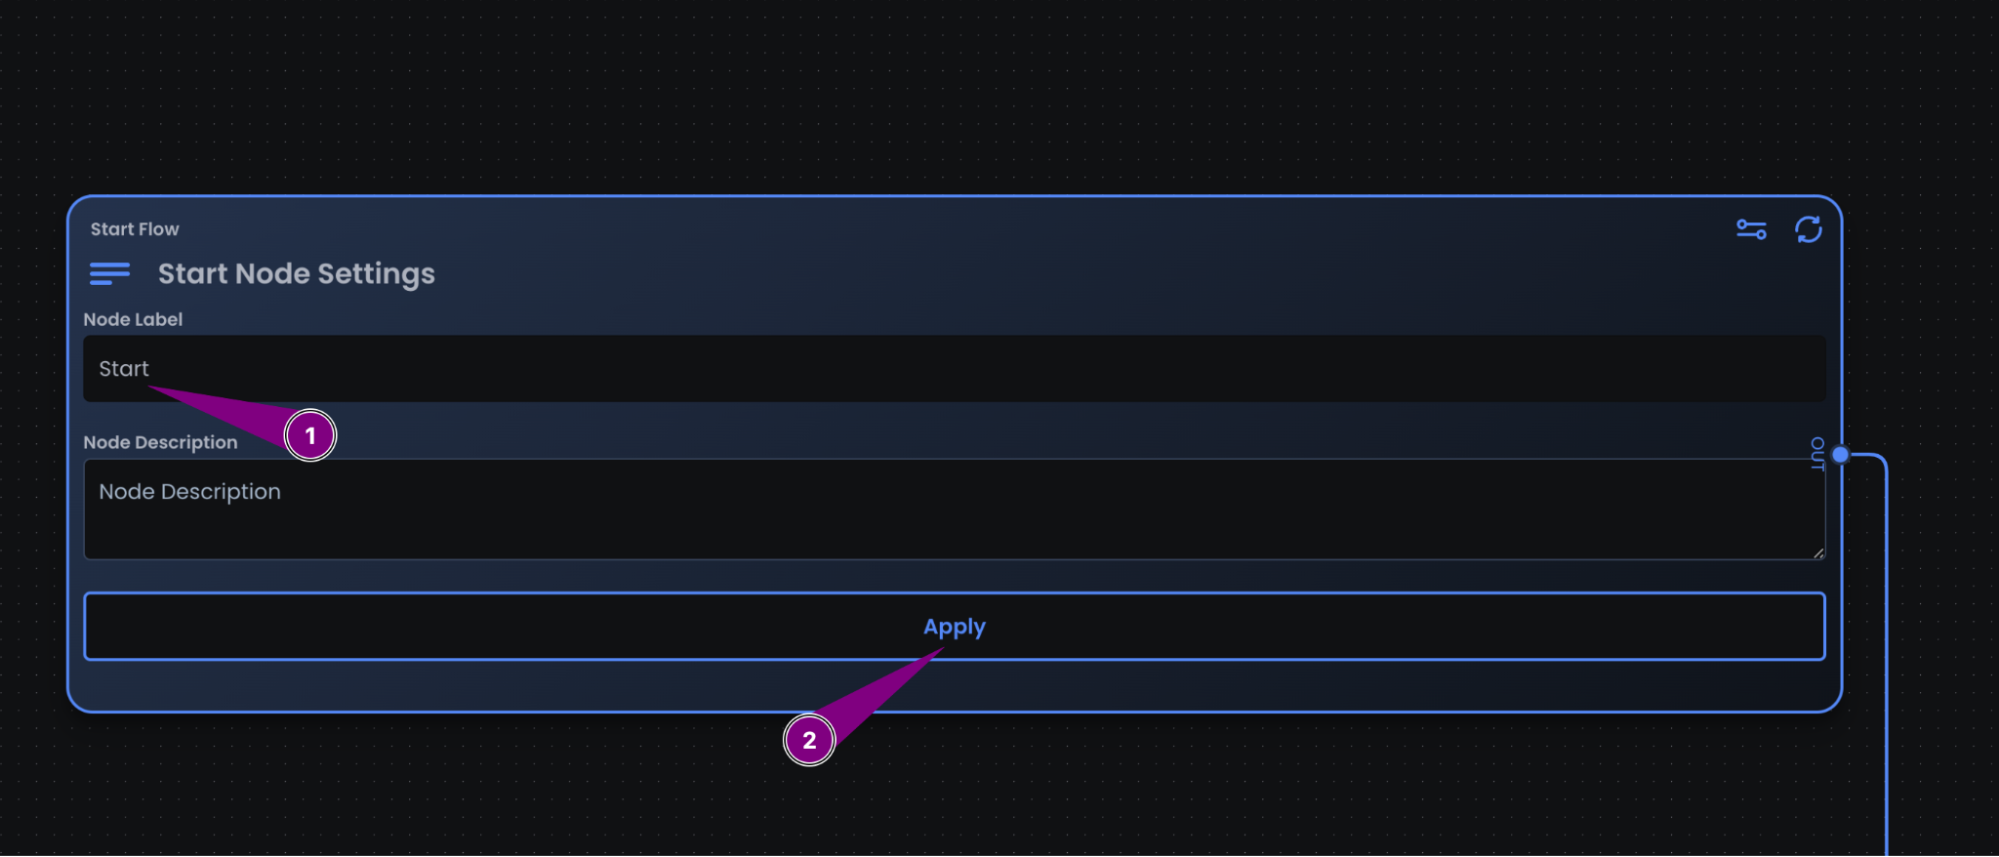
You will use this exact label in the next step when you create the Agent in /org. Pick something simple like Start.
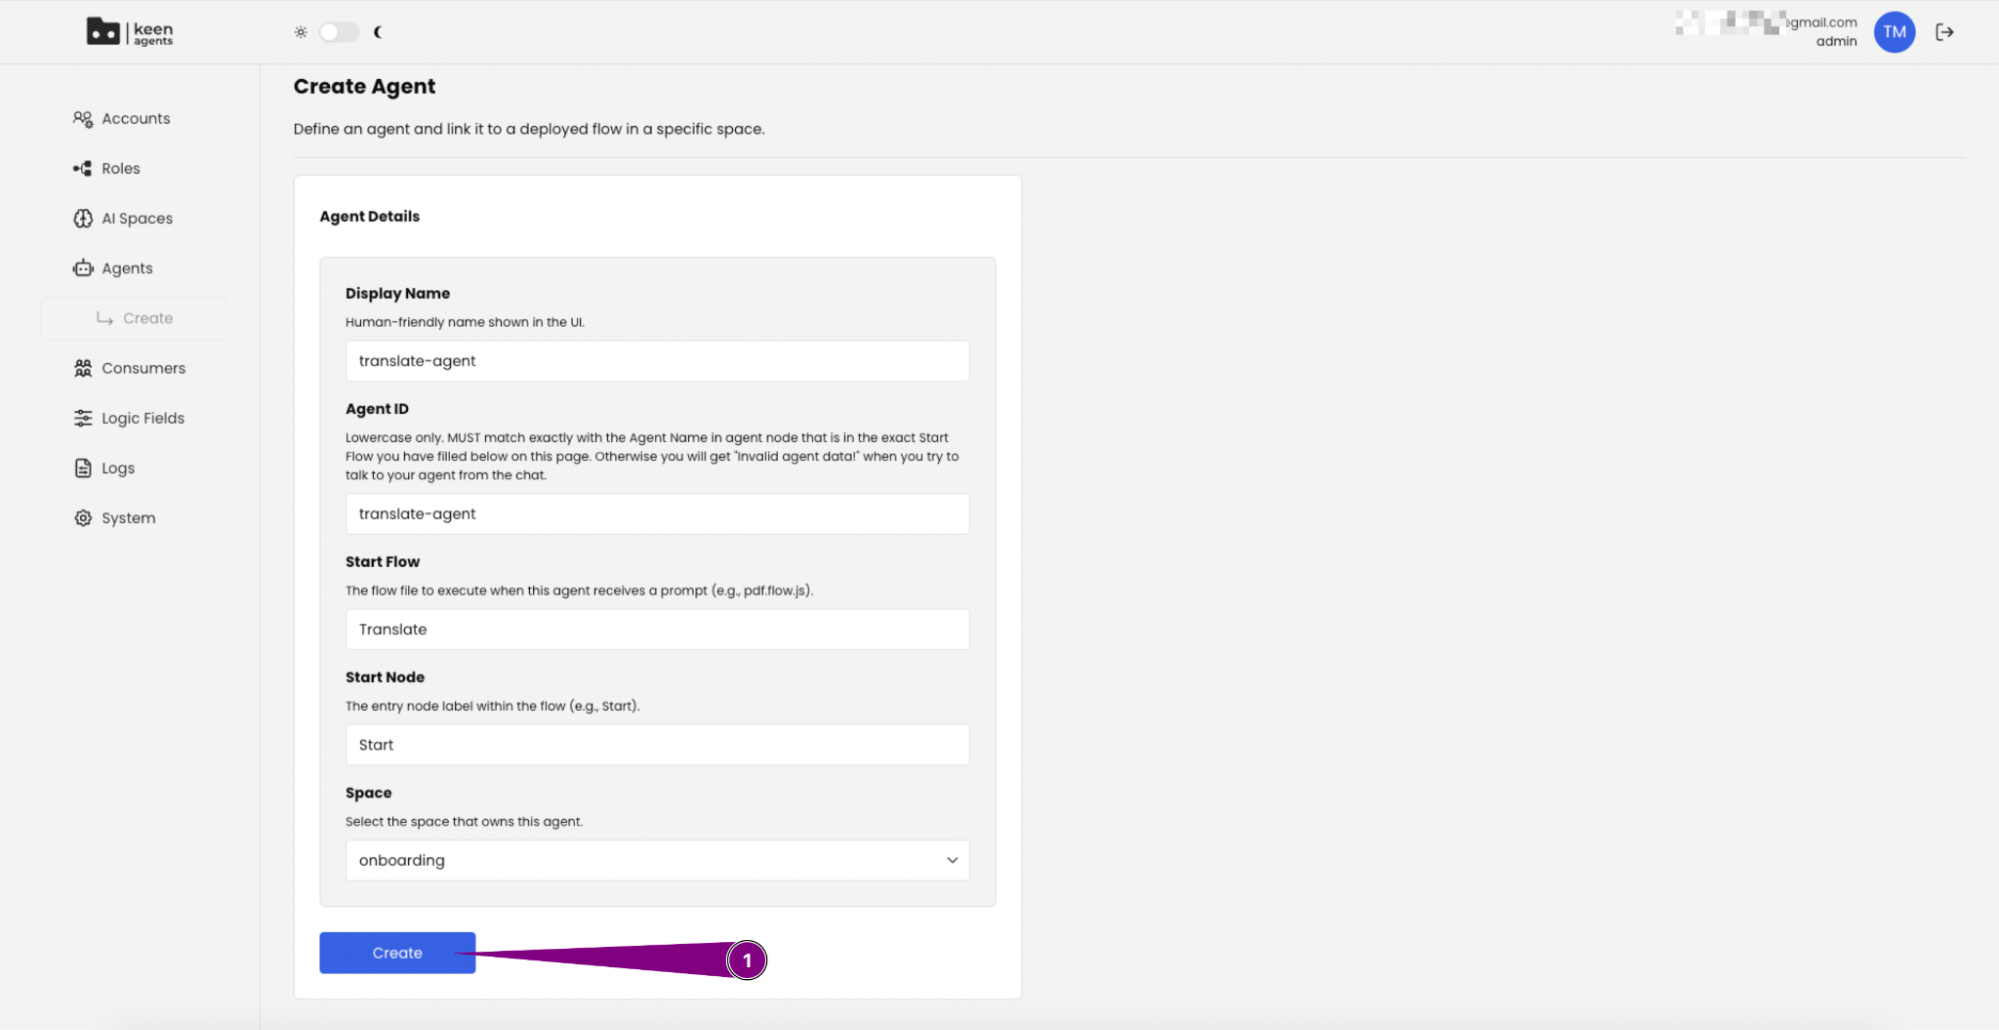
4.5 Hop to /org: create the Agent record
Now that you have a flow file name and a Start Node label, switch to /org and create the Agent. The names you enter here must match what you have in code.
-
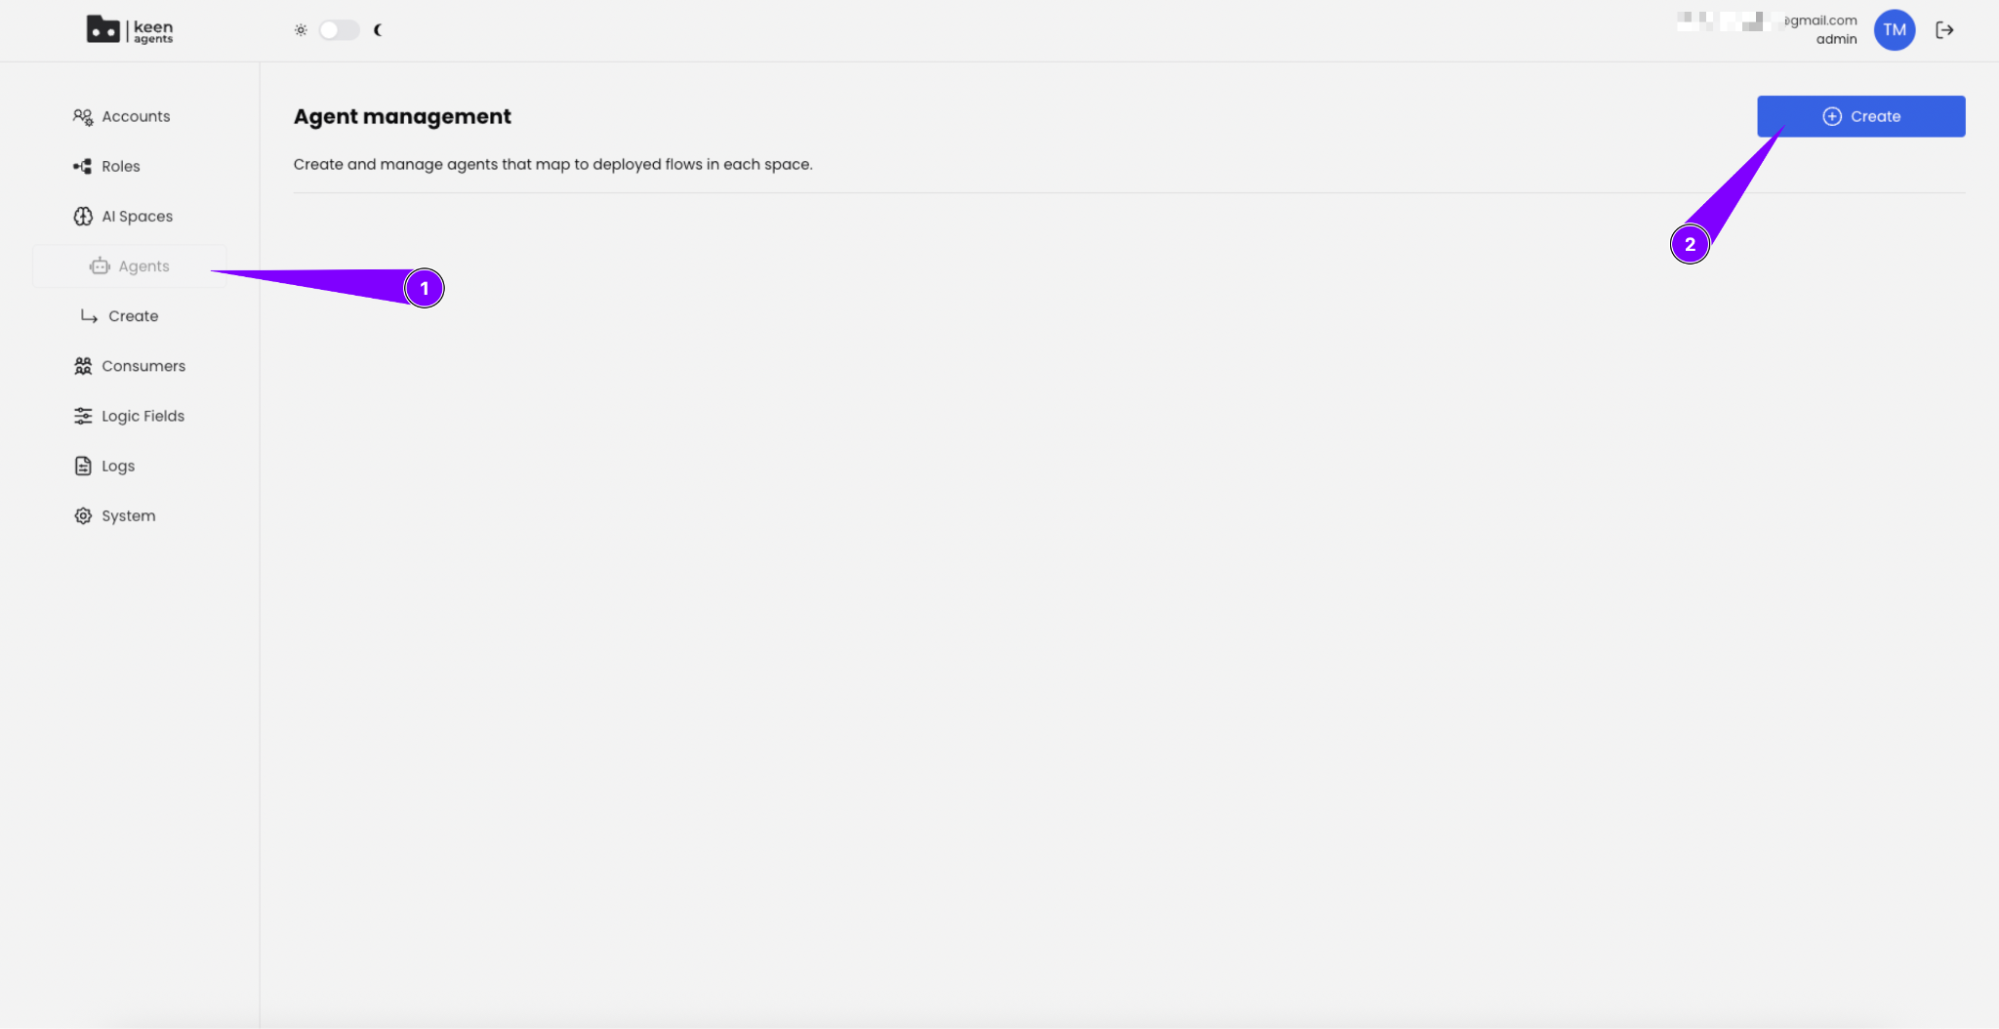
Open Agents from the sidebar (1), then click Create (2):
-
Fill in the form:
- Display Name — human-friendly name shown in the Chat agent picker (e.g.
translate-agent). - Agent ID — kebab-case only (e.g.
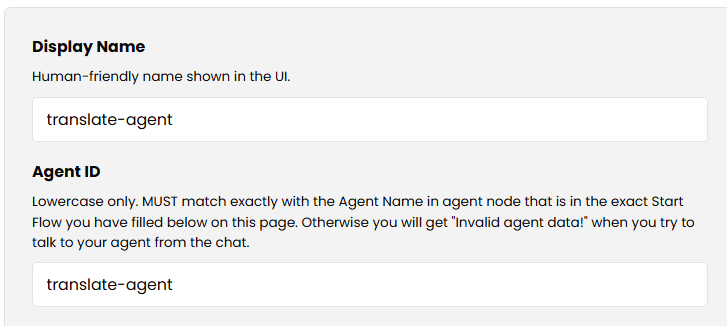
translate-agent). This must match the Agent Name you set on the Agent Node inside your flow exactly. Mismatch shows"Invalid agent data!"in the Chat. - Start Flow — the flow file name without extension (e.g.
Translate). The runtime resolvesTranslate.flow.jsoninside the Space's project. - Start Node — the label of the entry node inside that file (e.g.
Start). One word, capital first letter. - Space — the AI Space you created in section 3.1.
- Display Name — human-friendly name shown in the Chat agent picker (e.g.
-
Click Create:
The label of the Start Node has to match the label in the Agent in the sandbox administration:

4.6 Configure the Agent Node in your flow
Back in the canvas, click the Agent Node and open its settings (1, 2):
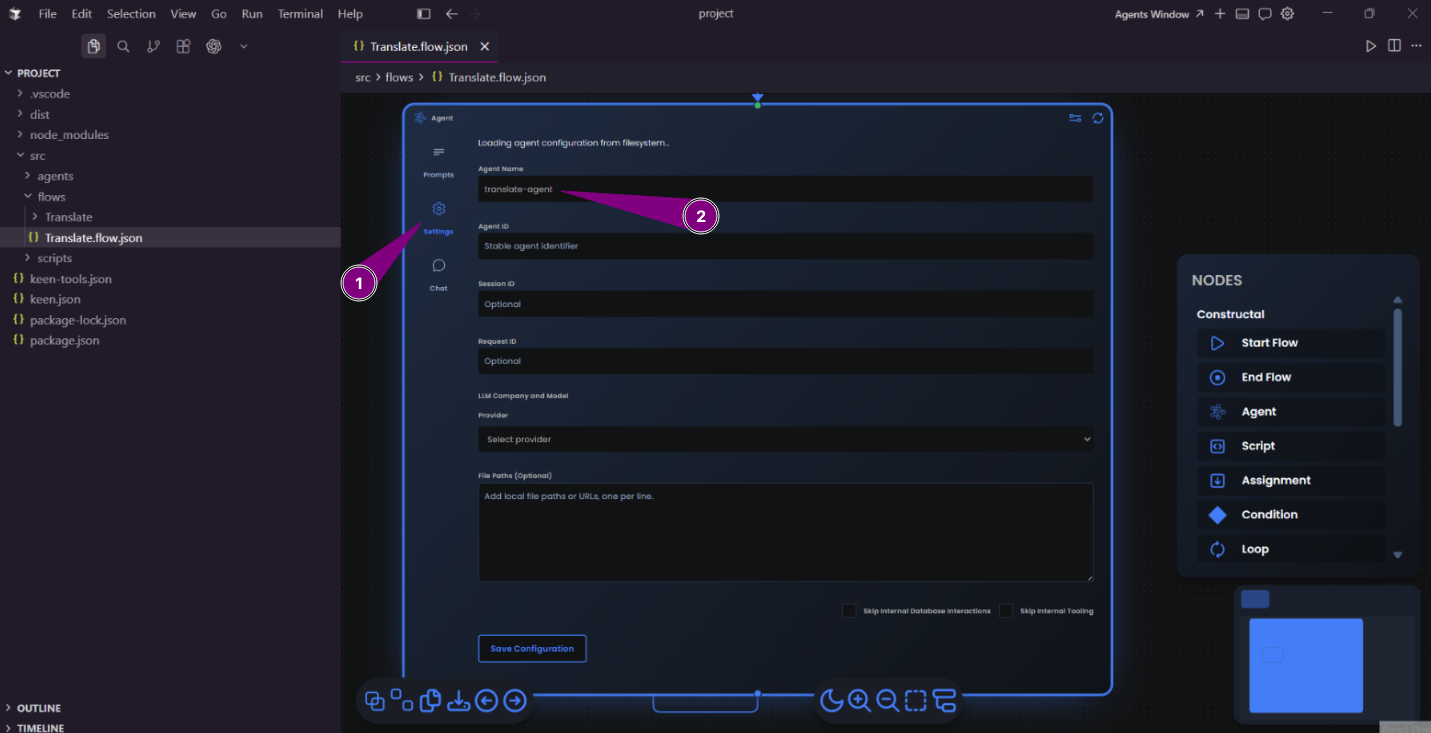
In settings, the Agent Name has to be in kebab-case. If it's not, you will get errors and you won't be able to connect with the agent. The default agent name doesn't work — you have to change it. Agent ID has to match Agent Name:
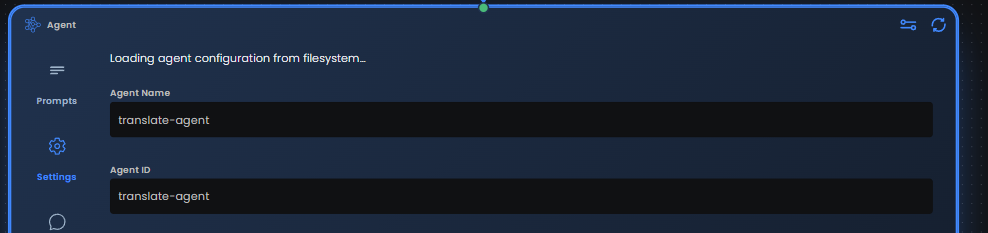
The Agent Name and Agent ID have to match the Agent ID in the sandbox administration:
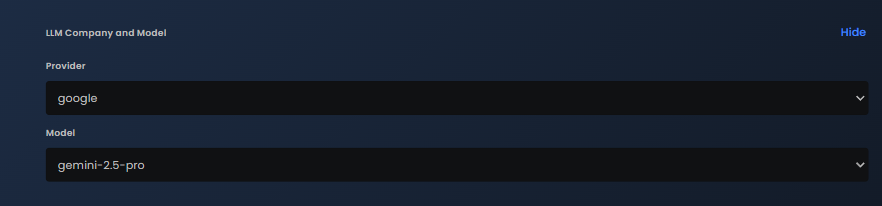
Pick an LLM Provider and Model from the Agent Node settings. Keen supports three providers — anthropic, openai, and google — each with their own models (e.g. google / gemini-2.5-pro, openai / gpt-4.1, or an anthropic Claude model). The provider and model you choose are stored in the agent's settings.json under llm.company and llm.model:
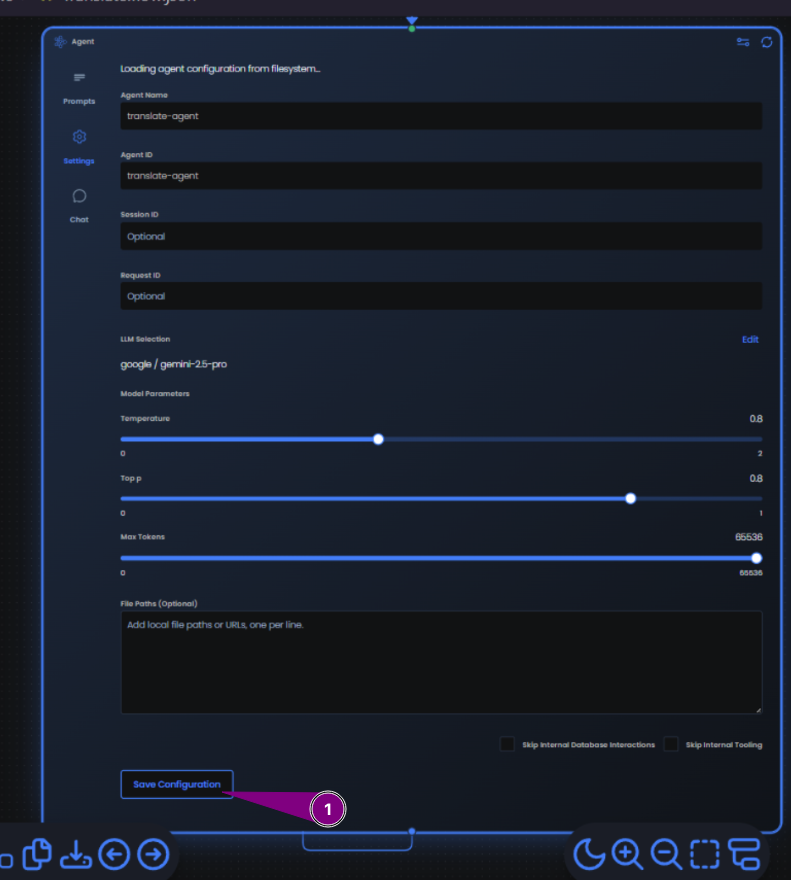
Always click on the Save Configuration button when you're ready. Do not collapse the node before that — the changes won't be applied.
4.7 Add prompts
Add your prompts in the Agent Node. You can do that in the Prompts menu in the left sidebar. You can add new prompts and change their role from the Add Turn button. You can only have one system prompt.
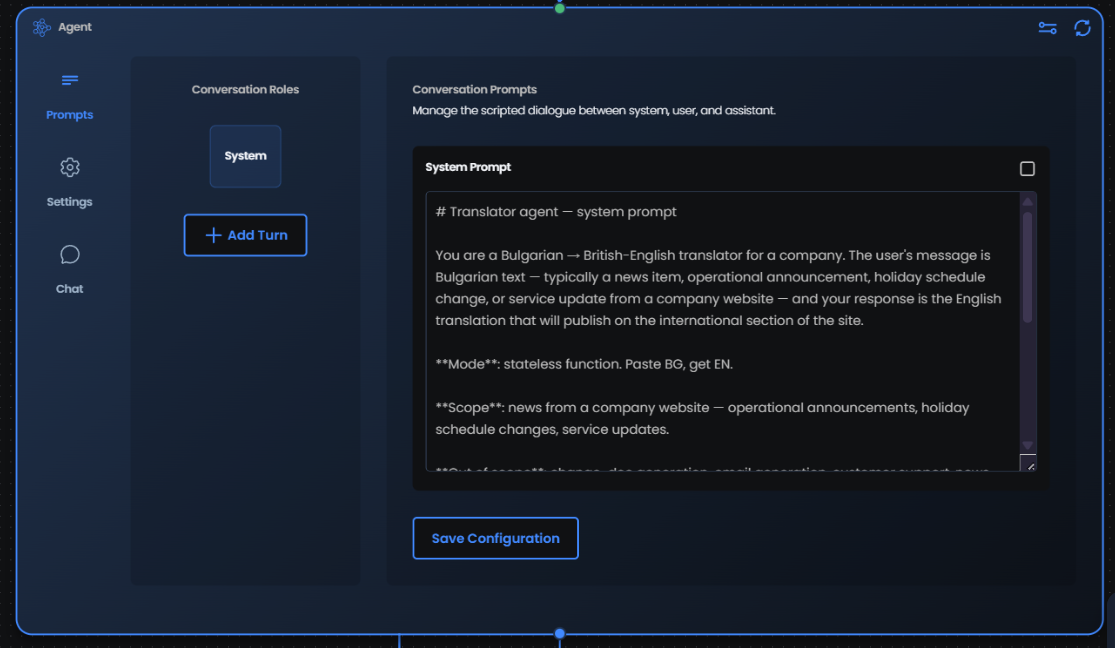
Click on Save Configuration.
4.8 Edit the agent files directly (optional)
For a better experience you can edit the agent definition directly in src/agents/[your-agent-name]/ (e.g. src/agents/translate-agent in this example). Each agent folder holds exactly two files:
00-system.md— the agent's system prompt (the pre-history). Edit it as plain Markdown.settings.json— the LLM config:agentNameplusllm(company,model,modelId,parameters).
src/agents/translate-agent/
├── 00-system.md   ← the system prompt
└── settings.json  ← agentName + llm { company, model, modelId, parameters }
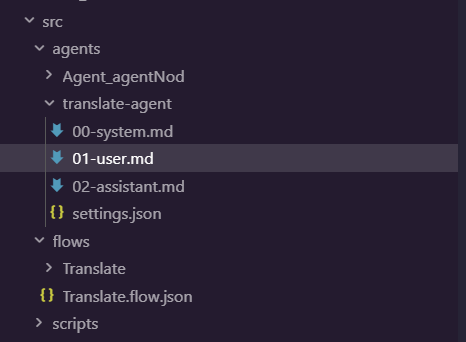
The additional user/assistant pre-history turns you add in the Prompts panel are stored in the Agent Node's settings, not as separate numbered files in this folder.
4.9 Agent folder not auto-created? Migrate popup
If a folder in agents with the name of your agent hasn't been created automatically after you changed the settings of your Agent Node, try saving your .flow.json file, or closing and reopening it again, then check if your previous changes have applied. If a pop-up asks you whether you want to migrate your agent files — click Yes.
Next: 5. Deploy →